VESA Evolution: Adapting CRT Monitors to Modern Mounts
By Sofia Jimenez • 31st Oct

Every monitor mount you see today stands on the shoulders of a quiet revolution that began when flat panels replaced bulky CRTs. The VESA standard evolution didn't just create compatibility, it rescued us from the chaos of proprietary mounting nightmares. I've seen too many enthusiasts return heavy gear because they skipped five minutes of measurement. Start with a preflight, end with a first-time fit. Let's turn mounting from guesswork into guarantee.
From Bulky Tubes to Slim Panels: The Mounting Maze
Before VESA entered the scene in 1997, mounting monitors was like navigating a minefield. CRT monitors (those deep, heavy beasts) had no universal standard. Manufacturers welded custom brackets directly to chassis or used mismatched screw patterns. When LCDs arrived, early adopters struggled to adapt their existing stands. I once watched a friend drill holes into a brand-new flat panel trying to fit it onto his CRT arm. Don't be that friend.
The original Flat Panel Monitor Physical Mounting Interface (FPMPMI) standard introduced the now-familiar 75x75mm and 100x100mm square hole patterns. This CRT to LCD mounting transition wasn't just about slimmer screens, it was about creating a language displays and monitor bracket mounts could speak together. By 2006, larger displays demanded expanded patterns like 200x200mm and 400x400mm, cementing VESA as the universal translator for our digital workspace.
Measure once properly, install once
Why Old Monitors Become Mounting Orphans
That beloved 2005 LCD gathering dust in your closet? It likely sports a 75x75mm or 100x100mm VESA pattern, but here's where pain hits: Older displays often lack rear clearance for modern articulating arms. The bulky power bricks and curved backs of early LCDs collide with mounting hardware. Meanwhile, true CRTs? They're historical monitor accessories with zero native VESA compatibility. This creates a brutal catch-22:
- The adapter trap: Cheap universal plates warp under weight or obscure ports
- The clearance crisis: Arms bump into CRT curvature or LCD transformer housings
- The phantom spec: Manufacturers listed vague "VESA-compatible" claims without pattern dimensions
I've debugged setups where users shipped three returns searching for one working configuration. The cost wasn't the money, it was the time wasted and confidence lost. Modern arms assume clean, flat mounting surfaces that pre-2010 displays simply don't have.

The Hidden Costs of Skipping Your Preflight
Ignoring adapter solutions for older monitors turns a simple upgrade into a furniture-moving ordeal. Watch for these silent failure points:
🔌 Port Blockage Pandemonium
Modern mounts tuck flush against displays, but early LCDs had input clusters jutting 2+ inches rearward. Your sleek new arm might perfectly position the screen... while completely blocking HDMI and power ports. Pro tip: Measure clearance from screen-back to port protrusion before buying.
⚖️ Weight Distribution Deception
That vintage 24" Dell might weigh 25lbs, but its center of gravity sits farther back than modern slim-bezel models. Generic arms rated for 30lbs sag instantly because specs assume balanced weight distribution. To pick a mechanism that won't sag under off-center loads, see our gas spring vs counterbalance comparison. Always verify COG in your manual's mechanical drawings.
📏 The "Approximate" Pattern Peril
"VESA-compliant" labels lied often in the early 2000s. A "100x100mm" label might actually be 98x102mm, enough to misalign threads. I've seen screws strip on first installation because users trusted marketing over measurement.
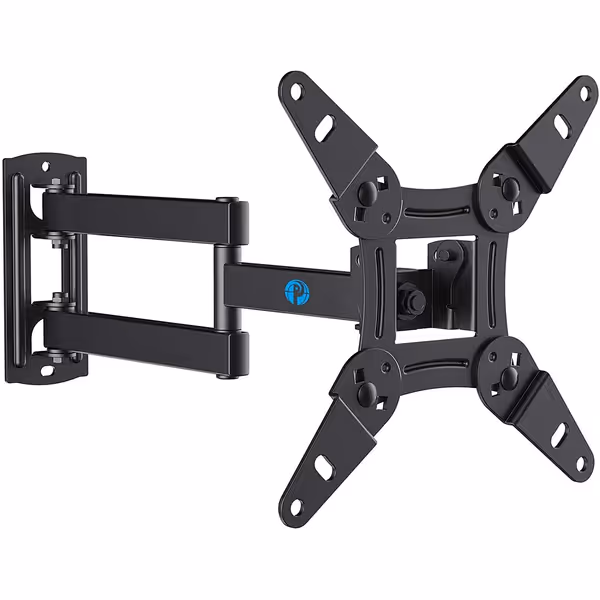
Pipishell Full Motion Wall Mount for 13-42 Inch TVs & Monitors
Full motion wall mount clears desk space, improves ergonomics for small to medium displays.
$16.98
Max VESA200x200mm
Max VESA200x200mm
Pros
Reclaims desk space for ergonomic monitor placement.
Full motion (rotate, tilt, swivel) for optimal viewing angles.
Easy single-stud installation with clear instructions and hardware.
Cons
Max 44lbs; not for heavy ultrawide or large screens.
Customers find the TV mount easy to install and follow, with clear instructions included. The mount is sturdy, moves smoothly in all directions, and is particularly suitable for smaller TVs and RVs. They appreciate its functionality, quality, and value for money.
Customers find the TV mount easy to install and follow, with clear instructions included. The mount is sturdy, moves smoothly in all directions, and is particularly suitable for smaller TVs and RVs. They appreciate its functionality, quality, and value for money.
Your Step-by-Step Preflight Checklist for Flawless Installation
Confidence comes from measurement, not marketing claims. If you're new to mounting, start with our VESA mount compatibility guide for the fundamentals. Here's how to future-proof your mount:
✅ The 5-Minute Hardware Audit
Grab your tape measure and flashlight, this prevents weeks of frustration:
- Map your VESA pattern:
- Measure center-to-center on both axes (horizontal/vertical) in millimeters
- Note any non-square patterns (e.g., 100x200mm for ultrawides)
- Verify thread depth: Early LCDs used shallow M4 threads vs. modern M6
- Measure critical clearances:
- From screen back to deepest port protrusion
- From mounting plate edge to display bezel
- Total depth including any rear kickstands
- Calculate true weight distribution:
- Weigh monitor with all cables attached
- Identify center of gravity (balance point on ruler)
- Subtract 20% from arm's max rating for safety margin
🔧 Adapter Solutions That Actually Work
For CRTs or non-VESA LCDs, avoid universal plates. Instead:
- CRT conversion kits: Look for welded steel plates that bolt to the monitor's entire rear frame (not just four points)
- Offset mounting brackets: Add 1-2" of rear clearance to avoid port collisions
- Pattern converters: Use stepped adapters (e.g., 75x75mm to 100x100mm) with shouldered screws to prevent stripping
A well-designed full motion mount can handle this transition smoothly, supporting patterns from 75x75mm to 200x200mm and providing around 2.7" of rear clearance to avoid port blockage. A removable plate system lets you pre-fit the adapter before mounting.
📐 The Clearance Verification Test
Before final installation:
- Tape your adapter plate to the monitor's back
- Position the arm at full extension
- Check three critical zones:
- Power/ports remain accessible
- No bezel contact with arm hardware
- Cable strain relief maintains 6"+ slack
This mimics real-world usage better than bench testing. I've rescued countless setups by catching clearance failures here. After clearance checks, tidy your runs with our monitor cable management guide.
Why Modern Mounts Still Fail Vintage Displays
Newer arms assume displays follow post-2010 design norms: slim profiles, centered weight, and standardized thread depths. When mounting older gear, you're fighting physics, not poor engineering. That's why:
- Articulating arms require thicker plates than early LCDs accommodate
- Gas-spring mechanisms need precise COG alignment rare in CRT-era designs
- Cable management channels assume rear ports sit within 1" of the panel
The solution isn't rejecting old gear, it's measuring smarter. A $15 pattern adapter costs less than shipping a 30lb monitor three times.
Your Action Plan: Measure Once, Mount Forever
Don't let legacy gear become e-waste. Tomorrow, do this:
- Locate your monitor's service manual (search "[model] mechanical specs pdf")
- Measure your VESA pattern with digital calipers (not tape measures, 0.5mm errors matter)
- Test-fit any adapter with blue painter's tape before drilling
When you honor the hardware's true dimensions, not what the box claims, you transform compatibility anxiety into calm certainty. I've mounted everything from 1998 CRTs to 49" ultrawides using this discipline. The magic isn't in the mount, it's in the measurement.
Your workspace deserves one-and-done perfection. Start with a preflight, end with a first-time fit. Measure once properly, install once.
Related Articles